

WebAssembly를 활용하려는 웹 개발자를 대상으로 하는 이 가이드에서는 실행 중인 예시를 통해 Wasm을 사용하여 CPU 집약적인 작업을 아웃소싱하는 방법을 알아봅니다. 이 가이드에서는 Wasm 모듈 로드부터 컴파일 및 인스턴스화 최적화까지 모든 내용을 다룹니다. 또한 CPU 집약적인 작업을 웹 워커로 이동하는 방법을 설명하고 웹 워커를 언제 생성할지, 영구적으로 활성 상태로 유지할지 아니면 필요할 때만 실행할지와 같은 구현 결정을 살펴봅니다. 이 가이드에서는 문제에 가장 적합한 솔루션을 제안할 때까지 접근 방식을 반복적으로 개발하고 성능 패턴을 한 번에 하나씩 도입합니다.
가정
네이티브에 가까운 성능을 위해 WebAssembly (Wasm)에 아웃소싱하려는 매우 CPU 집약적인 작업이 있다고 가정해 보겠습니다. 이 가이드에서 예로 사용된 CPU 집약적 작업은 숫자의 계승을 계산합니다. 팩토리얼은 정수와 그 아래의 모든 정수의 곱입니다. 예를 들어 4의 팩토리얼 (4!)은 24 (즉, 4 * 3 * 2 * 1)과 같습니다. 숫자는 빠르게 커집니다. 예를 들어 16!는 2,004,189,184입니다. CPU 사용량이 많은 작업의 더 현실적인 예는 바코드 스캔 또는 래스터 이미지 추적입니다.
factorial() 함수의 성능이 우수한 반복 (재귀가 아님) 구현은 C++로 작성된 다음 코드 샘플에 나와 있습니다.
#include <stdint.h>

extern "C" {

// Calculates the factorial of a non-negative integer n.
uint64_t factorial(unsigned int n) {
    uint64_t result = 1;
    for (unsigned int i = 2; i <= n; ++i) {
        result *= i;
    }
    return result;
}

}
이 문서의 나머지 부분에서는 모든 코드 최적화 권장사항을 사용하여 Emscripten으로 이 factorial() 함수를 컴파일한 Wasm 모듈이 factorial.wasm 파일에 있다고 가정합니다.
이 작업을 실행하는 방법을 다시 알아보려면 ccall/cwrap을 사용하여 JavaScript에서 컴파일된 C 함수 호출을 참고하세요.
다음 명령어는 factorial.wasm를 독립형 Wasm으로 컴파일하는 데 사용되었습니다.
emcc -O3 factorial.cpp -o factorial.wasm -s WASM_BIGINT -s EXPORTED_FUNCTIONS='["_factorial"]' --no-entry
HTML에는 output 및 제출 button과 페어링된 input이 있는 form이 있습니다. 이러한 요소는 이름을 기반으로 JavaScript에서 참조됩니다.
<form>
  <label>The factorial of <input type="text" value="12" /></label> is
  <output>479001600</output>.
  <button type="submit">Calculate</button>
</form>
const input = document.querySelector('input');
const output = document.querySelector('output');
const button = document.querySelector('button');
모듈 로드, 컴파일, 인스턴스화
Wasm 모듈을 사용하려면 먼저 로드해야 합니다. 웹에서는 fetch() API를 통해 이 작업이 이루어집니다. 웹 앱이 CPU 집약적인 작업을 위해 Wasm 모듈에 의존한다는 것을 알고 있으므로 가능한 한 빨리 Wasm 파일을 미리 로드해야 합니다. 앱의 <head> 섹션에서 CORS 지원 가져오기를 사용하여 이를 실행합니다.
<link rel="preload" as="fetch" href="factorial.wasm" crossorigin />
실제로 fetch() API는 비동기식이며 결과를 await해야 합니다.
fetch('factorial.wasm');
다음으로 Wasm 모듈을 컴파일하고 인스턴스화합니다. 이러한 작업을 위한 WebAssembly.compile()(및 WebAssembly.compileStreaming())과 WebAssembly.instantiate()이라는 이름의 함수가 있지만 대신 WebAssembly.instantiateStreaming() 메서드는 fetch()와 같은 스트리밍된 기본 소스에서 직접 Wasm 모듈을 컴파일하고 인스턴스화합니다. await은 필요하지 않습니다. 이는 Wasm 코드를 로드하는 가장 효율적이고 최적화된 방법입니다. Wasm 모듈이 factorial() 함수를 내보낸다고 가정하면 바로 사용할 수 있습니다.
const importObject = {};
const resultObject = await WebAssembly.instantiateStreaming(
  fetch('factorial.wasm'),
  importObject,
);
const factorial = resultObject.instance.exports.factorial;

button.addEventListener('click', (e) => {
  e.preventDefault();
  output.textContent = factorial(parseInt(input.value, 10));
});
태스크를 웹 워커로 이동
CPU 집약적인 작업을 사용하여 기본 스레드에서 이를 실행하면 전체 앱이 차단될 위험이 있습니다. 이러한 작업을 웹 워커로 이동하는 것이 일반적입니다.
기본 스레드 재구성
CPU 집약적인 작업을 웹 워커로 이동하려면 먼저 애플리케이션을 재구성해야 합니다. 이제 기본 스레드는 Worker를 생성하며, 그 외에는 웹 워커에 입력을 전송한 다음 출력을 수신하여 표시하는 작업만 처리합니다.
/* Main thread. */

let worker = null;

// When the button is clicked, submit the input value
//  to the Web Worker.
button.addEventListener('click', (e) => {
  e.preventDefault();

  // Create the Web Worker lazily on-demand.
  if (!worker) {
    worker = new Worker('worker.js');

    // Listen for incoming messages and display the result.
    worker.addEventListener('message', (e) => {
      output.textContent = e.result;
    });
  }

  worker.postMessage({ integer: parseInt(input.value, 10) });
});
나쁨: 작업이 웹 워커에서 실행되지만 코드가 경합 상태임
웹 워커는 Wasm 모듈을 인스턴스화하고 메시지를 수신하면 CPU 집약적인 작업을 실행하고 결과를 기본 스레드로 다시 전송합니다.
이 접근 방식의 문제는 WebAssembly.instantiateStreaming()로 Wasm 모듈을 인스턴스화하는 것이 비동기 작업이라는 점입니다. 이는 코드가 레이스 상태임을 의미합니다. 최악의 경우 기본 스레드가 웹 작업자가 아직 준비되지 않았을 때 데이터를 전송하고 웹 작업자는 메시지를 수신하지 않습니다.
/* Worker thread. */

// Instantiate the Wasm module.
// 🚫 This code is racy! If a message comes in while
// the promise is still being awaited, it's lost.
const importObject = {};
const resultObject = await WebAssembly.instantiateStreaming(
  fetch('factorial.wasm'),
  importObject,
);
const factorial = resultObject.instance.exports.factorial;

// Listen for incoming messages, run the task,
// and post the result.
self.addEventListener('message', (e) => {
  const { integer } = e.data;
  self.postMessage({ result: factorial(integer) });
});
더 나은 방법: 작업이 웹 작업자에서 실행되지만 로드 및 컴파일이 중복될 수 있음
비동기 Wasm 모듈 인스턴스화 문제를 해결하는 한 가지 방법은 Wasm 모듈 로드, 컴파일, 인스턴스화를 모두 이벤트 리스너로 이동하는 것이지만, 이렇게 하면 수신된 모든 메시지에서 이 작업이 발생해야 합니다. HTTP 캐싱과 컴파일된 Wasm 바이트 코드를 캐시할 수 있는 HTTP 캐시를 사용하면 최악의 솔루션은 아니지만 더 나은 방법이 있습니다.
비동기 코드를 웹 워커의 시작 부분으로 이동하고 실제로 프로미스가 이행되기를 기다리지 않고 프로미스를 변수에 저장하면 프로그램이 코드의 이벤트 리스너 부분으로 즉시 이동하므로 기본 스레드의 메시지가 손실되지 않습니다. 이벤트 리스너 내부에서 프로미스를 기다릴 수 있습니다.
/* Worker thread. */

const importObject = {};
// Instantiate the Wasm module.
// 🚫 If the `Worker` is spun up frequently, the loading
// compiling, and instantiating work will happen every time.
const wasmPromise = WebAssembly.instantiateStreaming(
  fetch('factorial.wasm'),
  importObject,
);

// Listen for incoming messages
self.addEventListener('message', async (e) => {
  const { integer } = e.data;
  const resultObject = await wasmPromise;
  const factorial = resultObject.instance.exports.factorial;
  const result = factorial(integer);
  self.postMessage({ result });
});
양호: 태스크가 웹 워커에서 실행되고 한 번만 로드 및 컴파일됨
정적 WebAssembly.compileStreaming() 메서드의 결과는 WebAssembly.Module로 확인되는 프로미스입니다.
이 객체의 유용한 기능 중 하나는 postMessage()를 사용하여 전송할 수 있다는 것입니다.
즉, Wasm 모듈을 메인 스레드 (또는 로드 및 컴파일만 담당하는 다른 웹 워커)에서 한 번만 로드하고 컴파일한 다음 CPU 집약적인 작업을 담당하는 웹 워커로 전송할 수 있습니다. 다음 코드는 이 흐름을 보여줍니다.
/* Main thread. */

const modulePromise = WebAssembly.compileStreaming(fetch('factorial.wasm'));

let worker = null;

// When the button is clicked, submit the input value
// and the Wasm module to the Web Worker.
button.addEventListener('click', async (e) => {
  e.preventDefault();

  // Create the Web Worker lazily on-demand.
  if (!worker) {
    worker = new Worker('worker.js');

    // Listen for incoming messages and display the result.
    worker.addEventListener('message', (e) => {
      output.textContent = e.result;
    });
  }

  worker.postMessage({
    integer: parseInt(input.value, 10),
    module: await modulePromise,
  });
});
웹 워커 측에서는 WebAssembly.Module 객체를 추출하고 인스턴스화하기만 하면 됩니다. WebAssembly.Module가 포함된 메시지는 스트리밍되지 않으므로 이제 웹 워커의 코드는 이전의 instantiateStreaming() 변형이 아닌 WebAssembly.instantiate()를 사용합니다. 인스턴스화된 모듈은 변수에 캐시되므로 인스턴스화 작업은 웹 워커를 시작할 때 한 번만 발생하면 됩니다.
/* Worker thread. */

let instance = null;

// Listen for incoming messages
self.addEventListener('message', async (e) => {
  // Extract the `WebAssembly.Module` from the message.
  const { integer, module } = e.data;
  const importObject = {};
  // Instantiate the Wasm module that came via `postMessage()`.
  instance = instance || (await WebAssembly.instantiate(module, importObject));
  const factorial = instance.exports.factorial;
  const result = factorial(integer);
  self.postMessage({ result });
});
완벽함: 태스크가 인라인 웹 워커에서 실행되고 한 번만 로드 및 컴파일됨
HTTP 캐싱을 사용하더라도 캐시된 웹 워커 코드를 가져오고 네트워크에 도달하는 것은 비용이 많이 듭니다. 일반적인 성능 트릭은 웹 작업자를 인라인으로 처리하고 blob: URL로 로드하는 것입니다. 하지만 Web Worker와 기본 스레드의 컨텍스트는 동일한 JavaScript 소스 파일을 기반으로 하더라도 다르므로 컴파일된 Wasm 모듈을 인스턴스화를 위해 Web Worker에 전달해야 합니다.
/* Main thread. */

const modulePromise = WebAssembly.compileStreaming(fetch('factorial.wasm'));

let worker = null;

const blobURL = URL.createObjectURL(
  new Blob(
    [
      `
let instance = null;

self.addEventListener('message', async (e) => {
  // Extract the \`WebAssembly.Module\` from the message.
  const {integer, module} = e.data;
  const importObject = {};
  // Instantiate the Wasm module that came via \`postMessage()\`.
  instance = instance || await WebAssembly.instantiate(module, importObject);
  const factorial = instance.exports.factorial;
  const result = factorial(integer);
  self.postMessage({result});
});
`,
    ],
    { type: 'text/javascript' },
  ),
);

button.addEventListener('click', async (e) => {
  e.preventDefault();

  // Create the Web Worker lazily on-demand.
  if (!worker) {
    worker = new Worker(blobURL);

    // Listen for incoming messages and display the result.
    worker.addEventListener('message', (e) => {
      output.textContent = e.result;
    });
  }

  worker.postMessage({
    integer: parseInt(input.value, 10),
    module: await modulePromise,
  });
});
지연 또는 즉시 웹 워커 생성
지금까지 모든 코드 샘플은 버튼을 눌렀을 때와 같이 필요할 때 웹 워커를 지연 로드했습니다. 애플리케이션에 따라 앱이 유휴 상태일 때 또는 앱의 부트스트랩 프로세스의 일부로 웹 워커를 더 적극적으로 만드는 것이 적절할 수 있습니다. 따라서 Web Worker 생성 코드를 버튼의 이벤트 리스너 외부로 이동합니다.
const worker = new Worker(blobURL);

// Listen for incoming messages and display the result.
worker.addEventListener('message', (e) => {
  output.textContent = e.result;
});
웹 워커를 유지할지 여부
자신에게 물어볼 수 있는 한 가지 질문은 Web Worker를 영구적으로 유지해야 하는지 아니면 필요할 때마다 다시 만들어야 하는지입니다. 두 접근 방식 모두 가능하며 장단점이 있습니다. 예를 들어 웹 작업자를 영구적으로 유지하면 앱의 메모리 사용량이 증가하고 동시 작업을 처리하기가 더 어려워질 수 있습니다. 웹 작업자에서 오는 결과를 요청에 다시 매핑해야 하기 때문입니다. 반면 웹 작업자의 부트스트랩 코드는 다소 복잡할 수 있으므로 매번 새 코드를 만들면 오버헤드가 많이 발생할 수 있습니다. 다행히 User Timing API를 사용하여 측정할 수 있습니다.
지금까지의 코드 샘플에서는 하나의 영구 웹 작업자를 유지했습니다. 다음 코드 샘플은 필요할 때마다 새 웹 워커를 임시로 만듭니다. 웹 워커 종료는 직접 추적해야 합니다. (코드 스니펫은 오류 처리를 건너뛰지만 문제가 발생할 경우 성공 또는 실패 여부에 관계없이 모든 경우에 종료해야 합니다.)
/* Main thread. */

let worker = null;

const modulePromise = WebAssembly.compileStreaming(fetch('factorial.wasm'));

const blobURL = URL.createObjectURL(
  new Blob(
    [
      `
// Caching the instance means you can switch between
// throw-away and permanent Web Worker freely.
let instance = null;

self.addEventListener('message', async (e) => {
  // Extract the \`WebAssembly.Module\` from the message.
  const {integer, module} = e.data;
  const importObject = {};
  // Instantiate the Wasm module that came via \`postMessage()\`.
  instance = instance || await WebAssembly.instantiate(module, importObject);
  const factorial = instance.exports.factorial;
  const result = factorial(integer);
  self.postMessage({result});
});
`,
    ],
    { type: 'text/javascript' },
  ),
);

button.addEventListener('click', async (e) => {
  e.preventDefault();
  // Terminate a potentially running Web Worker.
  if (worker) {
    worker.terminate();
  }
  // Create the Web Worker lazily on-demand.
  worker = new Worker(blobURL);
  worker.addEventListener('message', (e) => {
    worker.terminate();
    worker = null;
    output.textContent = e.data.result;
  });
  worker.postMessage({
    integer: parseInt(input.value, 10),
    module: await modulePromise,
  });
});
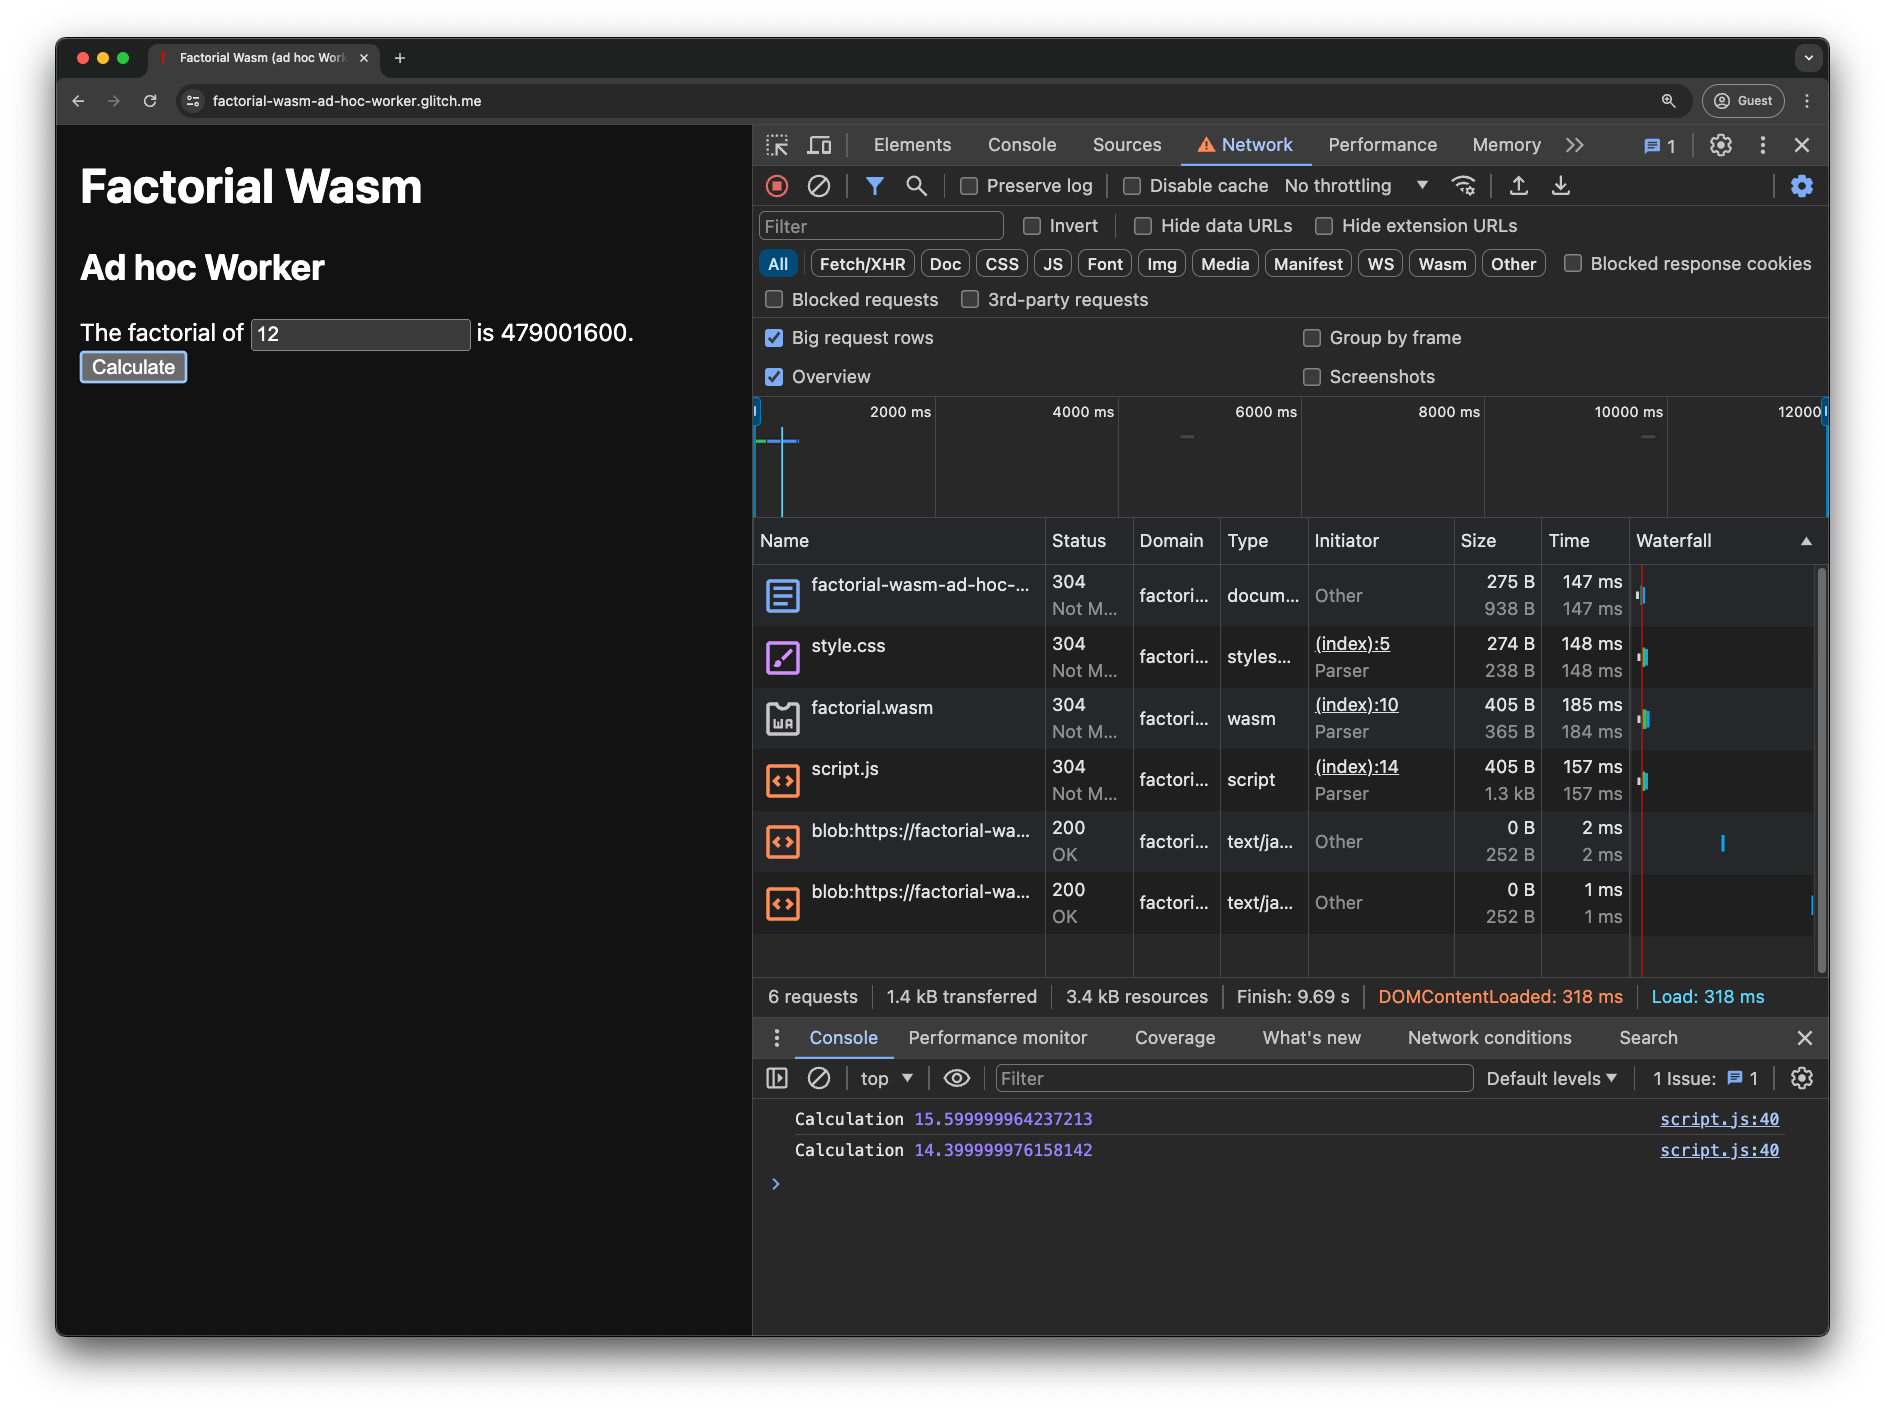
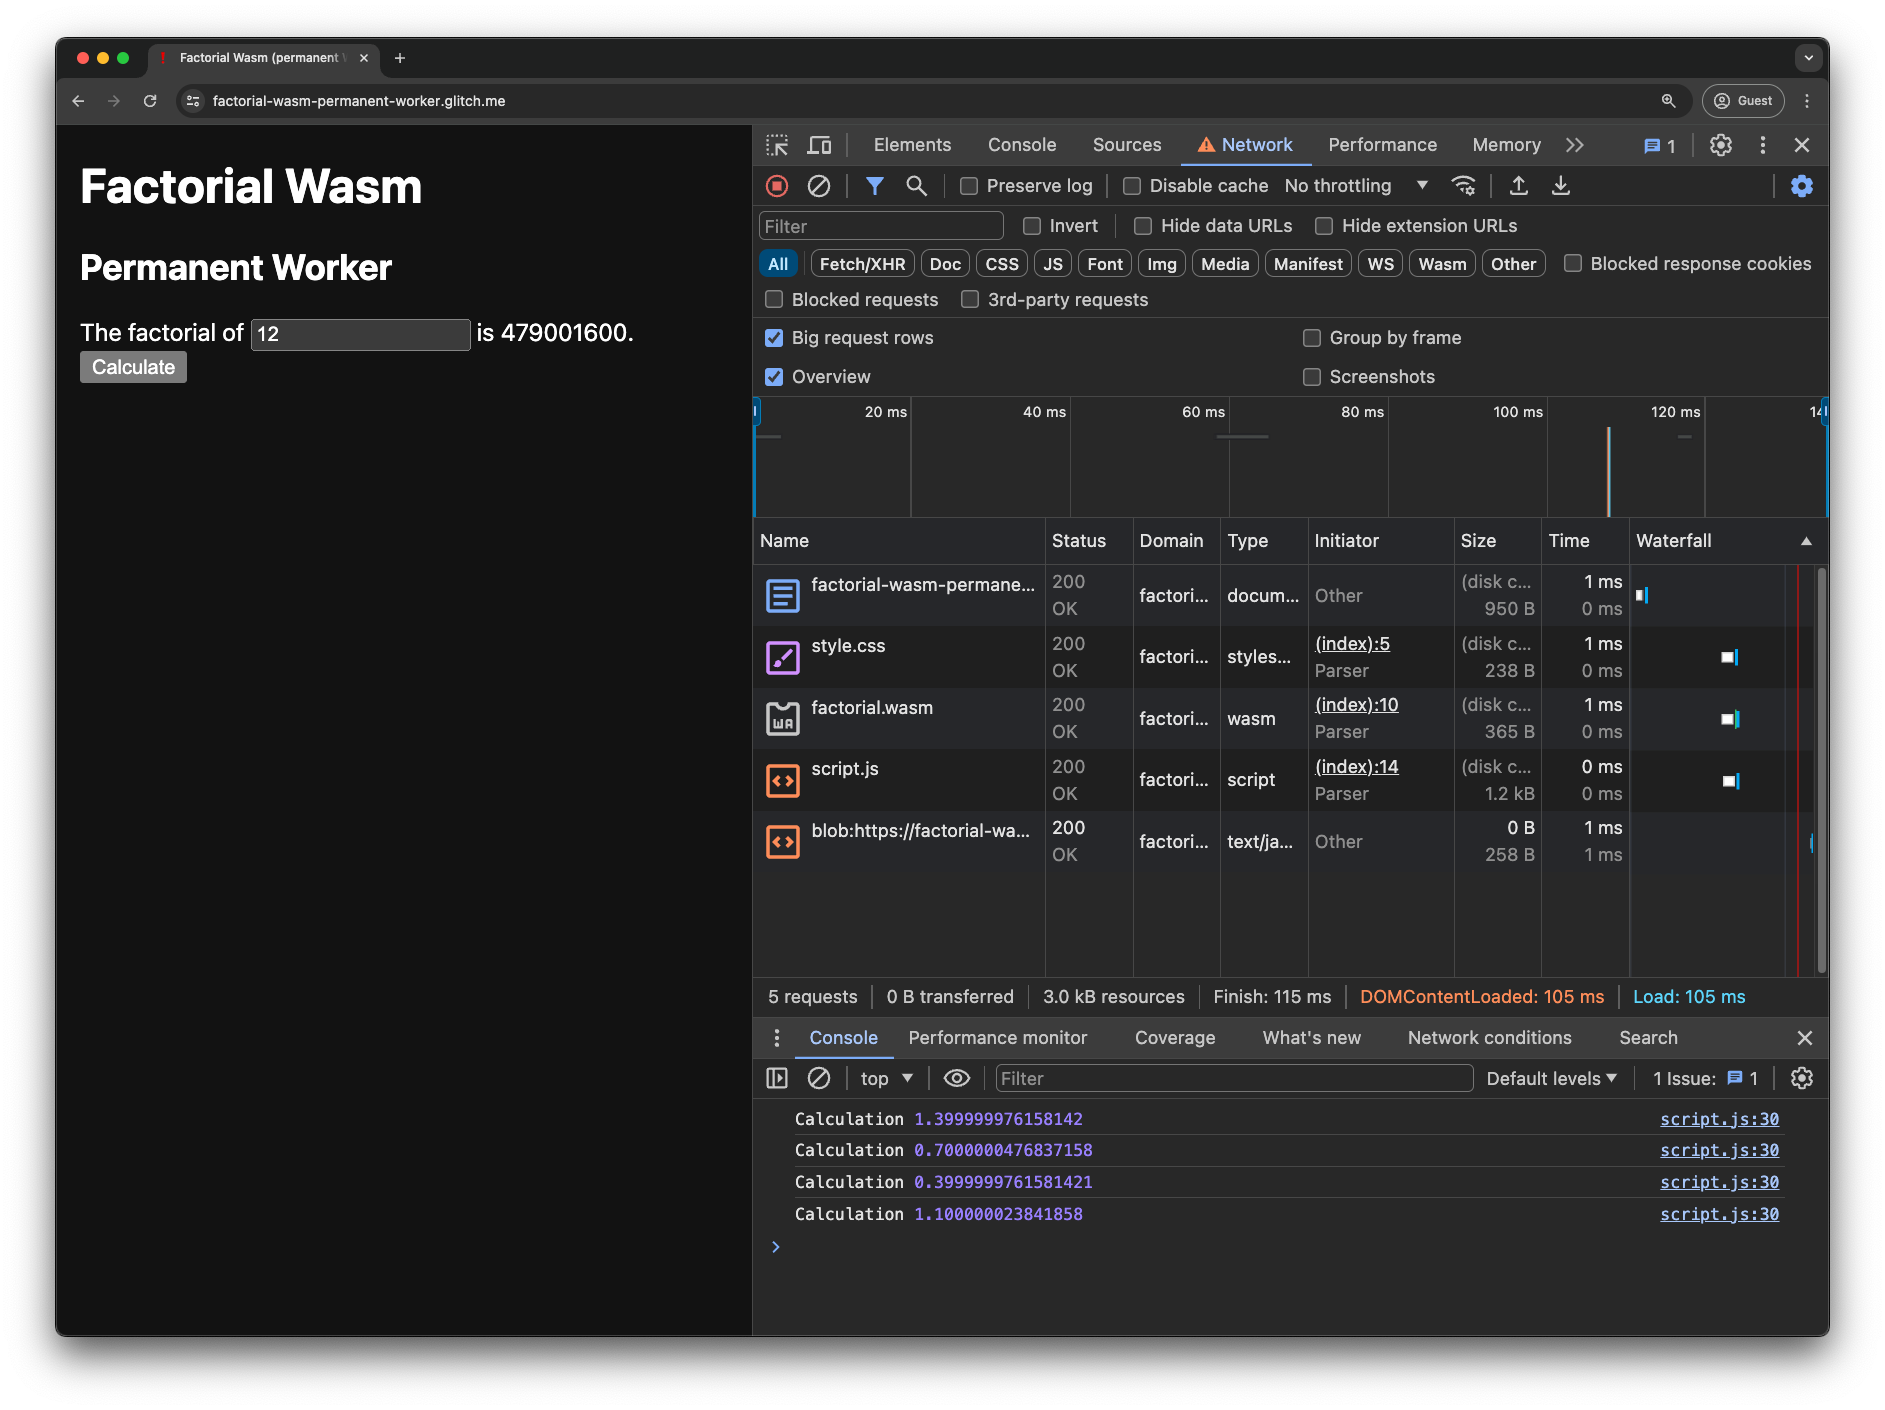
데모
두 가지 데모를 사용해 볼 수 있습니다. 임시 웹 작업자(소스 코드)가 있는 항목과 영구 웹 작업자(소스 코드)가 있는 항목이 있습니다.
Chrome DevTools를 열고 콘솔을 확인하면 버튼 클릭부터 화면에 결과가 표시될 때까지 걸리는 시간을 측정하는 User Timing API 로그를 확인할 수 있습니다. 네트워크 탭에는 blob: URL 요청이 표시됩니다. 이 예에서 임시와 영구 간의 타이밍 차이는 약 3배입니다. 실제로 사람의 눈에는 이 경우 둘 다 구별할 수 없습니다. 실제 앱의 결과는 다를 수 있습니다.
결론
이 게시물에서는 Wasm을 처리하기 위한 몇 가지 성능 패턴을 살펴봤습니다.
- 일반적으로 스트리밍 메서드(
WebAssembly.compileStreaming()및WebAssembly.instantiateStreaming())를 스트리밍이 아닌 메서드 (WebAssembly.compile()및WebAssembly.instantiate())보다 선호합니다. - 가능하다면 Web Worker에서 성능이 많이 필요한 작업을 아웃소싱하고 Web Worker 외부에서 Wasm 로드 및 컴파일 작업을 한 번만 실행하세요. 이렇게 하면 Web Worker가
WebAssembly.instantiate()로 로드 및 컴파일이 발생한 기본 스레드에서 수신한 Wasm 모듈만 인스턴스화하면 됩니다. 즉, Web Worker를 영구적으로 유지하는 경우 인스턴스를 캐시할 수 있습니다. - 영구 웹 작업자를 계속 유지하는 것이 타당한지 아니면 필요할 때마다 임시 웹 작업자를 만드는 것이 타당한지 신중하게 측정하세요. 웹 워커를 만들기에 가장 적절한 시기도 생각해 보세요. 고려해야 할 사항은 메모리 소비, 웹 워커 인스턴스화 기간뿐만 아니라 동시 요청을 처리해야 할 수 있는 복잡성도 있습니다.
이러한 패턴을 고려하면 최적의 Wasm 성능을 달성할 수 있습니다.
감사의 말씀
이 가이드는 Andreas Haas, Jakob Kummerow, Deepti Gandluri, Alon Zakai, Francis McCabe, François Beaufort, Rachel Andrew가 검토했습니다.